This Blog has new home – www.javahabit.com


So Finally I have made the big move. I took the plunge and have launched /moved this blog to http://www.javahabit.com.

Posted in Combination | Leave a comment

Apache Camel – How to call an external webservice


I have made up my mind to get rid of WSO2 ESB at my office. It is clumsy, buggy, hard to test, no body wants to work on it and the documentation is horrible. I looked at various alternative and Apache Camel was free and easy to set up and work with me.

To cut the story short, I was able to run most of the example but was struggling with CXF to call a third party service hosted. The documentation on the website is focused on exposing web service built in Camel. I was finally able to figure this out with a couple of slide show on slideshare.

Here’s the scenario: I have a third party webservice hosted on the web which gives you the the conversion rate between two currencies. I am going to call this web service and log the response.

There are two ways to call this webservice, a) Using

As usual I will start from scratch. My webservice is hosted at this url –http://www.webservicex.net/CurrencyConvertor.asmx?WSDL. This webservice exposes a operation called – “ConversionRate”.

I am using Fuse Ide(free – Developer version) but you can use Intellij Or Eclipse.

Prerequisites – Must have Maven.

Step 1: Create a new Camel-Spring project.

Step 2:  Add the following dependencies in your pom.xml. “camel-cxf”

<dependency>

      <groupId>org.apache.camel</groupId>

      <artifactId>camel-cxf</artifactId>

      <version>2.10.0.redhat-60024</version>

    </dependency>

My pom.xml looks like this –

<!–?xml version=”1.0″ encoding=”UTF-8″?>

xmlns=”http://maven.apache.org/POM/4.0.0&#8243; xmlns:xsi=”http://www.w3.org/2001/XMLSchema-instance&#8221; xsi:schemaLocation=”http://maven.apache.org/POM/4.0.0 http://maven.apache.org/maven-v4_0_0.xsd”&gt;


  <modelVersion>4.0.0</modelVersion>


  <groupId>com.mycompany</groupId>

  <artifactId>camel-spring</artifactId>

  <packaging>jar</packaging>

  <version>1.0.0-SNAPSHOT</version>

  <name>A Camel Spring Route</name>

  <url>http://www.myorganization.org</url&gt;

  <properties>

    <project.build.sourceEncoding>UTF-8</project.build.sourceEncoding>

    <project.reporting.outputEncoding>UTF-8</project.reporting.outputEncoding>

  </properties>

  <repositories>

    <repository>

      <id>release.fusesource.org</id>

      FuseSource Release Repository

      <url>http://repo.fusesource.com/nexus/content/repositories/releases</url&gt;

      <snapshots>

        <enabled>false</enabled>

      </snapshots>

      <releases>

        <enabled>true</enabled>

      </releases>

    </repository>

    <repository>

      <id>snapshot.fusesource.org</id>

      FuseSource Snapshot Repository

      <url>http://repo.fusesource.com/nexus/content/repositories/snapshots</url&gt;

      <snapshots>

        <enabled>true</enabled>

      </snapshots>

      <releases>

        <enabled>false</enabled>

      </releases>

    </repository>

  </repositories>

  <pluginRepositories>

    <pluginRepository>

      <id>release.fusesource.org</id>

      FuseSource Release Repository

      <url>http://repo.fusesource.com/nexus/content/repositories/releases</url&gt;

      <snapshots>

        <enabled>false</enabled>

      </snapshots>

      <releases>

        <enabled>true</enabled>

      </releases>

    </pluginRepository>

    <pluginRepository>

      <id>snapshot.fusesource.org</id>

      FuseSource Snapshot Repository

      <url>http://repo.fusesource.com/nexus/content/repositories/snapshots</url&gt;

      <snapshots>

        <enabled>true</enabled>

      </snapshots>

      <releases>

        <enabled>false</enabled>

      </releases>

    </pluginRepository>  

  </pluginRepositories>


  <dependencies>

    <dependency>

      <groupId>org.apache.camel</groupId>

      <artifactId>camel-core</artifactId>

      <version>2.10.0.redhat-60024</version>

    </dependency>

    <dependency>

      <groupId>org.apache.camel</groupId>

      <artifactId>camel-spring</artifactId>

      <version>2.10.0.redhat-60024</version>

    </dependency>

    <!– logging –>

    <dependency>

      <groupId>org.slf4j</groupId>

      <artifactId>slf4j-api</artifactId>

      <version>1.6.6</version>

    </dependency>

    <dependency>

      <groupId>org.slf4j</groupId>

      <artifactId>slf4j-log4j12</artifactId>

      <version>1.6.6</version>

    </dependency>

    <dependency>

      <groupId>log4j</groupId>

      <artifactId>log4j</artifactId>

      <version>1.2.17</version>

    </dependency>

    <!– testing –>

    <dependency>

      <groupId>org.apache.camel</groupId>

      <artifactId>camel-test-spring</artifactId>

      <version>2.10.0.redhat-60024</version>

      <scope>test</scope>

    </dependency>

<dependency>

      <groupId>org.apache.camel</groupId>

      <artifactId>camel-cxf</artifactId>

      <version>2.10.0.redhat-60024</version>

    </dependency>

  </dependencies>

  <build>

    <defaultGoal>install</defaultGoal>

    <plugins>

      <plugin>

        <groupId>org.apache.maven.plugins</groupId>

        <artifactId>maven-compiler-plugin</artifactId>

        <version>2.5.1</version>

        <configuration>

          <source>1.6</source>

          <target>1.6</target>

        </configuration>

      </plugin>

      <plugin>

        <groupId>org.apache.maven.plugins</groupId>

        <artifactId>maven-resources-plugin</artifactId>

        <version>2.4.3</version>

        <configuration>

          <encoding>UTF-8</encoding>

        </configuration>

      </plugin>

      <!– allows the route to be ran via ‘mvn camel:run’ –>

      <plugin>

        <groupId>org.apache.camel</groupId>

        <artifactId>camel-maven-plugin</artifactId>

        <version>2.10.0.redhat-60024</version>

      </plugin>

    </plugins>

  </build>

</project>

Step 2: Under src/main.resources/META-INF folder(if not there then create one) create file called camel-context.xml.  Your camel file should like this –

<?xml version=”1.0″ encoding=”UTF-8″?>

xmlns=”http://www.springframework.org/schema/beans&#8221;

        xmlns:xsi=”http://www.w3.org/2001/XMLSchema-instance&#8221;

        xmlns:cxf=”http://camel.apache.org/schema/cxf&#8221;

        xsi:schemaLocation=”

        http://www.springframework.org/schema/beans http://www.springframework.org/schema/beans/spring-beans.xsd

        http://camel.apache.org/schema/cxf http://camel.apache.org/schema/cxf/camel-cxf.xsd

        http://camel.apache.org/schema/spring http://camel.apache.org/schema/spring/camel-spring.xsd”&gt;

  <cxf:cxfEndpoint id=”wsdlEndpoint”

                     address=”http://www.webservicex.net/CurrencyConvertor.asmx&#8221;

                     endpointName=”c:SOAPOverHTTP”

                     serviceName=”c:CurrencyConvertor”

                     xmlns:s=”http://www.webserviceX.NET”/&gt;


  <camelContext xmlns=”http://camel.apache.org/schema/spring”&gt;

  <route>

        here is a sample which processes the input files

         (leaving them in place – see the ‘noop’ flag)

         then performs content based routing on the message using XPath</description>

        src/data/order?noop=true”/>

        <log message=”${body}”/>

        wsdl&serviceName={http://www.webserviceX.NET/}CurrencyConvertor&portName={http://www.webserviceX.NET/}CurrencyConvertorSoap&dataFormat=MESSAGE”/>

         <log message=”${body}”/>

    </route>

</camelContext>


</beans>

Step 4: Place the payload or input data xml in src/data/input/order.xml. The order.xml should like this –

<soapenv:Envelope xmlns:soapenv=”http://schemas.xmlsoap.org/soap/envelope/&#8221; xmlns:web=”http://www.webserviceX.NET/”&gt;

   <soapenv:Header/>

   <soapenv:Body>

      <web:ConversionRate>

         <web:FromCurrency>AUD</web:FromCurrency>

         <web:ToCurrency>USD</web:ToCurrency>

      </web:ConversionRate>

   <!–soapenv:Body>–>

<!–soapenv:Envelope>–>

That’s it!!!!

The interesting part is all in the camel-context.xml. Here’s what is happening in this file

src/data/order?noop=true”/>

This line reads the file order.xml. The option noop=true makes the file to be read again and again. By default this values is false. If this value is false, then after one read, camel marks it as read and when you run the example for second time, it will not read this file.

<log message=”${body}”/>

This line will simply log the contents of order.xml.

serviceName={http://www.webserviceX.NET/}CurrencyConvertor&portName={http://www.webserviceX.NET/}CurrencyConvertorSoap&dataFormat=MESSAGE”/>

 This line tells cxf component that it needs to call the webservice –  http://www.webservicex.net/CurrencyConvertor.asmx?wsdl

-URL – is the url of the wsdl http://www.webservicex.net/CurrencyConvertor.asmx?wsdl

  • serviceName – is the name of the service. Remember it is the name of teh service not the oepration!! The value between {} is the namespace. If you do not want to write {http://….} then add another tag xmlns   – {http://www.webserviceX.NET/}CurrencyConvertor. 
  • portName – is the name of the port.

portName={http://www.webserviceX.NET/}CurrencyConvertorSoap. This is again preceded by {http://…} which is the namespace value. This value is defined in the wsdl as –<wsdl:port name=”CurrencyConvertorSoap” binding=”tns:CurrencyConvertorSoap”>

The last piece is dataFormat  – dataFormat=MESSAGE. This tells that the body is of type message.

Part 2 – In production you would want to avoid writing cxf in the above format as it is prone to error because the string value is very long and difficult to test independently and cannot be reused if you want to call the service in another route. So the best way is to define this as cxf endpoint. All you need to do is slighly modify the camel-context.xml. 

  1. Add this(be sure to remove the earlier version of <to uri=”cxf….”)

<to uri=”cxf:bean:wsdlEndpoint?dataFormat=MESSAGE”/>

  1. Define the cxf endpoint called wsdlEndpoint (You call it whatever you want).

<cxf:cxfEndpoint id=”wsdlEndpoint”

                     address=”http://www.webservicex.net/CurrencyConvertor.asmx&#8221;

                     endpointName=”c:SOAPOverHTTP”

                     serviceName=”c:CurrencyConvertor”

                     xmlns:s=”http://www.webserviceX.NET”/&gt;

That’s it.

Now just run the app. This will print the following-

[ead #0 – file://src/data/order] route1                         INFO

<soapenv:Header/>

<soapenv:Body>

<web:ConversionRate>

<web:FromCurrency>AUD</web:FromCurrency>

<web:ToCurrency>USD</web:ToCurrency>

</web:ConversionRate>

<!–soapenv:Body>–>

<!–soapenv:Envelope>–>

[           default-workqueue-1] route1                         INFO  0.8951

~~~~ Enjoy Cameling ….

Posted in Combination | Tagged , , , , | 2 Comments

Launch Website in Amazon EC2


I wrote this blog about a year ago and left it in the draft because this post somehow was not getting auto saved on WordPress and since its long post it took time for me type, take screenshots and paste. I did not have energy and time to do it all over again. I had a copy of it though in my google drive and I cannot tell you how many times this document has helped me.

Now I have a short-term memory. I remember phone numbers which I heard 10-15 years ago but some how command line arguments, street names etc. have always been elusive. My wife keeps poking fun at me when I drive and says that I am “directionally challenged”. I just cannot remember a route. I am absent-minded, not blank, but my mind just keep thinking all the time. I follow the same route to office every day, however as it often happens that I am always lost in my thoughts, I would take I-85 South ramp instead of I-85 north ramp and I am baffled a minute or two later, at the exit signs and wonder why are the exit numbers decreasing.

Anyway the point is that this document will help some absent-minded like me who do the set up once but when something goes wrong do the research all over again and wonder what did I do the last time.

As usual I am going to start from scratch and would put this in steps.

1. Create a new Amazon web services account.

2. Go to your Console and select EC2 tab.

3. Now Lunch and instance. You will be shown a screen to select a wizard. You can choose between classic and quick wizard. The difference is that with classic wizard, you have fine grain control over what instance and software you want to install while Quick wizard is prebuilt server, for example – Ubuntu+Apache+Mysql+PHP. If you want the same instance set up on Classic wizard then you need install on your own.

I choose Classic Wizard. Click Continue.

Next I chose UBUNTU 12.04 32 bit.

Next choose your instance. I choose Micro instance.


You can also chose Request Spot Instance where you basically requests your own quote and can specify the largest amount that you intend to pay. Something like price negotiator.

Click Continue

Click Continue.

Next name your instance and click Continue.


Next create a Key-Value pair. Name your key and click Create and Download your Key Pair


Save the key on your local system and click continue.

Next configure your security settings. It will be named  quick-launch by default  with port 22 for sftp open. You can add more ports if you like. I added port 80(Http) and 443(Https).

Now you are ready to launch your server.

A confirmation page lets you know your instance is launching. Click Close to close the confirmation page.

In the Navigation pane, click Instances to view the status of your instance. It takes a short time for an instance to launch. The instance’s status will be pending while it’s launching.

Record the Public DNS name for your instance because you’ll need it for the next task. If you select the instance, its details (including the public DNS name) are displayed in the lower pane. You can also click Show/Hide in the top right corner of the page to select which columns to display.

ec2-xx-xx-xx-xx.compute-1.amazonaws.com

4. Connecting to your Linux instance

Just Right click and click Connect…. It will give you option to connect via ssh or java client. Choose java client. For Ubuntu, the user name is ubuntu. Specify the location of your  key-value pair that you downloaded earlier. Hit Connect. You are now connected.

5. Update ubuntu packages. Run this command –

apt-get update

apt-get upgrade –show-upgraded

6. Now we already have default user “ubuntu”. However I wanted to create my username. So create one –

sudo adduser example_user

You will be asked several questions like Full Name, Room number etc. Just click Enter and continue

Enter the new value, or press ENTER for the default

    Full Name []:

    Room Number []:

    Work Phone []:

    Home Phone []:

    Other []:

Is the information correct? [Y/n] y

7. Now we need to allow this new user to administer the system. So to do this we need to give it admin rights. Run this:

sudo usermod -a -G sudo example_user

8. Install Git

sudo apt-get install build-essential git-core curl

9. Install RVM to support different version of Ruby.

curl -L get.rvm.io | bash -s stable

10. Add RVM to bashrc

echo ‘[[ -s “$HOME/.rvm/scripts/rvm” ]] && source “$HOME/.rvm/scripts   /rvm”‘ >> ~/.bashrc

11. Reload bashrc file

. ~/.bashrc

12. Now exit from the session and type

type rvm| head -1

This will give you a message that “rvm is a function”

13. Next we will install ruby.

rvm install 1.9.3

14. Use ruby 1.9.3 as default

rvm –default use 1.9.3

15. To check the version of ruby-

ruby -v

This should tell you that you are using – “ruby 1.9.3p194”

16. Let’s install RAILS now.

gem install rails -v 3.2.1

Now you may run into issue and get this error

ubuntu@domU-12-31-39-09-84-B8:~$ gem install rails -v 3.2.1

ERROR:  Loading command: install (LoadError)

cannot load such file — zlib

ERROR:  While executing gem … (NameError)

uninitialized constant Gem::Commands::InstallCommand

If you get this error that do not worry, it is just telling you that you need to install some more packages.

Run these commands:

rvm pkg install zlib

rvm remove 1.9.3

rvm install 1.9.3

rvm –default use 1.9.3

gem install rails -v 3.2.1

17.  Time to install Mysql

sudo apt-get update

sudo apt-get upgrade –show-upgraded

sudo apt-get install libmysqlclient-dev

sudo apt-get install mysql-server

You will be prompted with Mysql installation screen. Just follow the instructions to set up root user name and password.

18. Update the git configuration

git config –global user.name “Firstname Lastname”

git config –global user.email “your_email@youremail.com

19) Install passenger and Nginx

gem install passenger

passenger-install-nginx-module

If you run into issues then run the following

apt-get install libopenssl-ruby

apt-get install libcurl4-openssl-dev

apt-get install libssl-dev

If you still run into issues where the installation instructions says that openssl-dev is not installed then run this command

rvm pkg install openssl

rvm remove 1.9.3

rvm install 1.9.3

rvm –default use 1.9.3

rvmsudo passenger-install-nginx-module  //You have to use rvmsudo if you are not logged in as root.

20) Download the code from now. To do that you need to create new ssh key and set it up on github.

ssh-keygen -t rsa -C “Your-emial-address@youremial.com”

– Copy the key value from /root/.ssh/id_rsa.pub and copy the key in your git hub account.(If you do not know how to add ssh key then see github help document. Basically just goto github settings–> ssh-keys–> Add Key)

– Now create your app folder. I created mine under /home/apps/. Now go to apps folder and run this command in terminal – git clone git@……….xxxx.git (Your git url).

21) Now we will install bundler.

Switch to your application folder, such as – cd /home/apps/albums and run the command

 gem install bundler

 bundle install

Ran into error below for Rmagick gem

Gem::Installer::ExtensionBuildError: ERROR: Failed to build gem native extension.

    /home/ubuntu/.rvm/rubies/ruby-1.9.3-p194/bin/ruby extconf.rb

checking for Ruby version >= 1.8.5… yes

extconf.rb:128: Use RbConfig instead of obsolete and deprecated Config.

checking for gcc… yes

checking for Magick-config… no

Can’t install RMagick 2.13.1. Can’t find Magick-config in /home/ubuntu/.rvm/gems/ruby-1.9.3-p194/bin:/home/ubuntu/.rvm/gems/ruby-1.9.3-p194@global/bin:/home/ubuntu/.rvm/rubies/ruby-1.9.3-p194/bin:/home/ubuntu/.rvm/bin:/usr/local/sbin:/usr/local/bin:/usr/sbin:/usr/bin:/sbin:/bin:/usr/games

*** extconf.rb failed ***

Could not create Makefile due to some reason, probably lack of

necessary libraries and/or headers.  Check the mkmf.log file for more

details.  You may need configuration options.

Provided configuration options:

    –with-opt-dir

    –with-opt-include

    –without-opt-include=${opt-dir}/include

    –with-opt-lib

    –without-opt-lib=${opt-dir}/lib

    –with-make-prog

    –without-make-prog

    –srcdir=.

    –curdir

    –ruby=/home/ubuntu/.rvm/rubies/ruby-1.9.3-p194/bin/ruby

Gem files will remain installed in /home/ubuntu/.rvm/gems/ruby-1.9.3-p194/gems/rmagick-2.13.1 for inspection.

Results logged to /home/ubuntu/.rvm/gems/ruby-1.9.3-p194/gems/rmagick-2.13.1/ext/RMagick/gem_make.out

An error occured while installing rmagick (2.13.1), and Bundler cannot continue.

Make sure that `gem install rmagick -v ‘2.13.1’` succeeds before bundling.

If you get the same error for Rmagick or Mysql or anything else, then run the below command.

sudo apt-get install libmagickwand-dev

Now re run the command

bundle install

22) Starting up the passenger now. However before we start passenger we need make sure that our database exist. So let’s create database and do the database migrations. Run the below commands –

rake db:create

rake db:migrate //// Now this will not create a production db, but will create dev, test db for you. If you intend to create a production DB as well then run this command –

RAILS_ENV=production rake db:create

RAILS_ENV=production rake db:migrate

I ran into issue and got the below error –

rake aborted!

Could not find a JavaScript runtime. See https://github.com/sstephenson/execjs for a list of available runtimes.

The forums said that I need to install nodeJs. So here’s the list of command to install nodeJs.

 sudo apt-get install python-software-properties

 sudo add-apt-repository ppa:chris-lea/node.js

 sudo apt-get update

 sudo apt-get install nodejs

Now the last thing you need to before starting passenger is pre compile your assets(css, images, js etc.). If you do not do this you will not be able to see the images and css. So run this command

bundle exec rake assets:precompile

Oh by the way if your images are not being served even after running the above command and starting passenger then you need to read my other post – https://railgaadi.wordpress.com/2012/01/28/engineyard-rails-3-x-nginx-passenger-assets-not-displayed/

P.S> The above issue is pretty common and first time user who are trying to promote run into the above issue and give up eventually. I stopped looking at it after 2 days… took a 3 day break and attacked the issue again 🙂

Now start the passenger.(Make sure that you have started Nginx  before starting Passenger else… see my earlier post – https://railgaadi.wordpress.com/2012/01/28/engineyard-rails-3-x-nginx-passenger-assets-not-displayed/)

passenger start -e production

I got error that “can’t connect to mysqlserver through socket tmp/mysql.sock”. If you run into this server then run this command

 mysqladmin variables | grep socket

If you have a root password then use

sudo mysqladmin -p variables | grep socket

The above command will give you socket name. In my case it gave me /tmp/var/mysq.lock.

Note this value and update your database.yml file and update the socket as given below.

development:
 adapter: mysql2
 host: localhost
 username: root
 password: xxxx
 database: xxxx
 socket: /tmp/mysql.sock

After you have updated the database.yml file you should be able to start the passenger.

23) Setting up NGINX

Make sure that you nginx.conf under /opt/nginx/conf file’s server section looks like this

server {

    listen    80;

    server_name  www.mysitename.com;

    access_log /srv/www/mysitename.com/logs/access.log;

    error_log /srv/www/mysitename.com/logs/error.log;

    root /home/myapp/album/public;

    passenger_enabled on;

    passenger_base_uri /home/myapp/album/public;

    #This property allows you to upload huge pictures files else you will get error 413- File too large

    client_max_body_size 5M;

    #charset koi8-r;

    #access_log  logs/host.access.log  main;

#    location / {

 #       root   /home/dinesh19aug/album/public;

 #       index  index.html index.htm;

 #   }

Happy launching 🙂

In case you are wondering what did I launch —- P.S. If you have been following my blog it’s my wife’s photography website. Wifeys website

~~Ciao

P.S. – Look forward for my first hand experience with Node.js in the next post.

Tagged , , , , , | Leave a comment

How to configure JNDI with Spring and Jboss4/5


This is a simple process but if you try and search on the web you will come across various incomplete solutions which will leave you more confused than you already were. This configuration involves just four simple steps that I will walk through to help you set up JNDI on Jboss. I am using Jboss 4.3, but this should be valid for other version of Jboss as well.

I have a web application which is built on Spring 3.2 and uses Hibernate 4. To set up a new JNDI configuration we will first create a datasource xml file. This file needs to be deployed in Jboss/Deploy folder along with your war file.

Step 1:

Create a datasource file oracle-ds.xml. The content of the file will look like this

<?xml version=”1.0″ encoding=”UTF-8″?>

<!DOCTYPE datasources PUBLIC “-//JBoss//DTD JBOSS JCA Config 1.5//EN” “http://www.jboss.org/j2ee/dtd/jboss-ds_1_5.dtd”&gt;

<datasources>

  <local-tx-datasource>

    <jndi-name>jdbc/listener-dss</jndi-name>

    <connection-url>jdbc:oracle:thin:@dbsrvossdevl:1521:US91</connection-url>

    <driver-class>oracle.jdbc.driver.OracleDriver</driver-class>

    <user-name>myuser</user-name>

    <password>mypassword</password>

    <min-pool-size>5</min-pool-size>

    <max-pool-size>50</max-pool-size>

    <idle-timeout-minutes>10</idle-timeout-minutes>

    <exception-sorter-class-name>org.jboss.resource.adapter.jdbc.vendor.OracleExceptionSorter</exception-sorter-class-name>

    <metadata>

      <type-mapping>Oracle9i</type-mapping>

    </metadata>

  </local-tx-datasource>

</datasources>


Explanation: <jndi-name>jdbc/listener-dss</jndi-name> . This line tells what is the jndi name that we are going to use across configuration files.


Step 2: Now open your web.xml file and add the resource-ref. This tells that jee container that your web application is using JNDI.

Your web.xml should be under WEB-INF folder. Add the below lines in your web.xml (see the highlighted section). This step is common whether you use Jboss or Tomcat or Websphere or any other application server.


<?xml version=”1.0″ encoding=”UTF-8″?>

<web-app version=”2.5″ xmlns=”http://java.sun.com/xml/ns/javaee&#8221; xmlns:xsi=”http://www.w3.org/2001/XMLSchema-instance&#8221;

  xsi:schemaLocation=”http://java.sun.com/xml/ns/javaee

  http://java.sun.com/xml/ns/javaee/web-app_2_5.xsd”&gt;

  <display-name>ACN Web Application</display-name>


    <servlet>

        <servlet-name>listener</servlet-name>

        <servlet-class>org.springframework.web.servlet.DispatcherServlet</servlet-class>

        <load-on-startup>1</load-on-startup>

    </servlet>


    <servlet-mapping>

        <servlet-name>listener</servlet-name>

        <url-pattern>/</url-pattern>

    </servlet-mapping>


    <context-param>

        <param-name>contextConfigLocation</param-name>

        <param-value>/WEB-INF/listener-servlet.xml</param-value>

    </context-param>

    <resource-ref>

        <description>Listener Database</description>

        <res-ref-name>jdbc/listener-dss</res-ref-name>

        <res-type>javax.sql.DataSource</res-type>

        <res-auth>Container</res-auth>

    </resource-ref>


    <listener>

        <listener-class>org.springframework.web.context.ContextLoaderListener</listener-class>

    </listener>


  <welcome-file-list>

    <welcome-file>index.jsp</welcome-file>

  </welcome-file-list>


</web-app>


Step 3: Next we will update the Spring context xml file to tell the Spring container that it needs to do a JNDI look up. My Spring context file name is listener-servlet.xml and this is under WEB-INF folder. Add the following(See highlighted section)


<beans xmlns=”http://www.springframework.org/schema/beans&#8221;

       xmlns:context=”http://www.springframework.org/schema/context&#8221;

       xmlns:mvc=”http://www.springframework.org/schema/mvc&#8221; xmlns:xsi=”http://www.w3.org/2001/XMLSchema-instance&#8221;

       xmlns:tx=”http://www.springframework.org/schema/tx&#8221;

       xmlns:p=”http://www.springframework.org/schema/p&#8221;

       xsi:schemaLocation=”http://www.springframework.org/schema/beans

        http://www.springframework.org/schema/beans/spring-beans-3.0.xsd

        http://www.springframework.org/schema/context

        http://www.springframework.org/schema/context/spring-context-3.0.xsd

        http://www.springframework.org/schema/mvc

        http://www.springframework.org/schema/mvc/spring-mvc-3.0.xsd

        http://www.springframework.org/schema/tx

        http://www.springframework.org/schema/tx/spring-tx.xsd “>

    <context:component-scan base-package=”com.acn.cslistener” />

    <mvc:annotation-driven />

    <tx:annotation-driven/>

    <bean

            class=”org.springframework.web.servlet.view.InternalResourceViewResolver”>

        <property name=”prefix”>

            <value>/WEB-INF/pages/</value>

        </property>

        <property name=”suffix”>

            <value>.jsp</value>

        </property>

    </bean>

    <bean id=”sessionFactory” class=”org.springframework.orm.hibernate4.LocalSessionFactoryBean”>

        <property name=”dataSource” ref=”dataSource”/>

        <property name=”hibernateProperties”>

            <props>

                <prop key=”hibernate.dialect”>org.hibernate.dialect.Oracle10gDialect</prop>

                <prop key=”hibernate.show_sql”>true</prop>

            </props>

        </property>

        <property name=”packagesToScan” value=”com.acn.cslistener” />

    </bean>

    <bean id=”dataSource” class=”org.springframework.jndi.JndiObjectFactoryBean”>

        <property name=”jndiName” value=”java:comp/env/jdbc/listener-dss”/>

    </bean>

    <bean id=”transactionManager” class=”org.springframework.orm.hibernate4.HibernateTransactionManager”

          p:sessionFactory-ref=”sessionFactory”>

    </bean>

    <bean id=”persistenceAnnotation”    class=”org.springframework.orm.jpa.support.PersistenceAnnotationBeanPostProcessor” />

</beans>


Step 4: This is the crucial step. If you are using Jboss then it requires that you tell the web container that Jboss will provide the datasource .xml file where you have defined your jndi properties. Create a new file jboss-web.xml. Place this file under WEB-INF folder. The contents of the file whould like this.

<?xml version=”1.0″ encoding=”UTF-8″?>

<jboss-web>

    <resource-ref>

        <res-ref-name>jdbc/listener-dss</res-ref-name>

        <res-type>javax.sql.DataSource</res-type>

        <jndi-name>java:/jdbc/listener-dss</jndi-name>

    </resource-ref>

</jboss-web>

That’s all we need to do.


~~~~ Ciao. 


Tagged , , , , , , , , | Leave a comment

Rails: Jquery is not loading


It’s been a while I have posted anything. I have been extremly busy and have been working on an extremely critical project where we were asked to become PCI 2.0 compliant. I worked on some interesting problems however today I will be discussing on something trivial and discuss my frustration about Rails. I have to admit that a number of times I thought I should just give up and start learning Python or stick to my forte i.e. Java. BUT Ruby/Rails has been a love hate relationship for me. Every few months I pick up Rails again and struggle fixing the set up before I can start working on my website.

So a couple of months back my wife complained that she is not using her website to update client’s picture because there is no client login and the if she upload their album, the album is visible to everyone. So I fixed that and deployed the application. No issues.

So two months later about a week ago, I checked again with her and like all nagging wife she complained that she is still not using it because she cannot upload multiple images. So like a dutiful husband I set out to set up rails on my new mac and begin coding however my production branch was not working fine. I was seeing issue with flexslider and found that non of my images were not showing up and Rails complained that JQuery was not defined. I tried everything but I could not make it work.

So if you have been issues with JQuery make sure that you have checked these things:

1. Your gem file should have this line.

   gem ‘jquery-rails’
gem “flexslider”  — This if you are using flexslider

2. In your application.js, make sure that you have defined jquery and the most important thing …… notice the sequence.

//= require jquery_ujs
//= require jquery
//= require flexslider
//= require_tree .

My sequence was incorrect and I had defined juqery before jquery_ujs which was throwing error in my application.

Hope this post helps.


~Ciao


Tagged , , , , , , , | Leave a comment

How to post parameters to a url using Ajax/Javascript between two website


I am working a new project and I recently ran into an interesting problem. One of the web site that I keep up at work was supposed to take the user to another website which required me to add post parameters.

EX – http://www.mywebsite.makeapayment.com ==> Collects Billing information ex – name, amount, address etc.==> Post this information to http://www.vendor-website.com.

I did not realize the problem until I started coding and my colleague pointed out that as soon as http://www.mywebsite.makeapayment.com goes to my servlet, the servlet will not pass params to external web site if use “POST”, I had to use “GET” because servlet will look up relative path only and the HTTPServletRequest/Response object is specific to an application. So if I wanted to send parameters using servlet I could only that using action = GET. Now since I was passing sensitive information so I did not want to use GET.

A couple of solutions were discussed as follows:

1. Insert the params in database and use servlet get from the mywebsite.com to pass the primary key of the database. Ex – http://www.mywebsite.makeapayment.com ==>  www.vendor-website.com?key=10001. The vendor application look up the required params from the database.

2. Create a new JSP and use JavaScript onLoad() to pass the params as Hidden Input and submit as post to  www.vendor-website.com.

Ex – http://www.mywebsite.makeapayment.com==&gt; Servlet==> New Blank JSP with Hidden params loaded on onLoad() and submitted to vendor website ==> http://www.vendor-website.com.

3. Third approach is interesting and I had not tried this ever but looked promising and this is what I eventually implemented. Make an Ajax call to from the JSP page to your servlet and when the Ajax Call returns, post it to vendor web site.

Ex – http://www.mywebsite.makeapayment.com on hitting submit==> calls the JS, uses DWR to post to call the servlet==> Servlet does back ground processing like saving the records etc ==> Returns the control back to the JavaScript ==> Upon return in Ajax Call ==> Post to http://www.vendor-website.com.

I implemented the combination of one and three but here I am going to show you how post params to a different URL – i.e. solution 3

Let’s say I have a submit form with Name and address which needs to be saved in database when I submit the form and then I need to post the same information to different web site.

PersonalInformation.jsp

<html>

<head>

    <script>

       // I am not showing the code for DWR. You will need to include dwr and engine.js. Add dwr.xml in your web-inf and specify the class name and method you want to use as dwr call. This method is called in the dwr Ajax call back.


function submitAndGoToVendorSite()
{
var form = document.createElement(“FORM”);
form.method = “POST”;
form.style.display = “none”;
document.body.appendChild(form);
var url=”www.vendor-website.com”;
form.action = url;

            //My dwr ajax call gets a Json string from the servlet response.
var jsonString =      ‘{“transactionId”:”1368505156670″,”requesterType”:”APP”,”billingEmail”:”null@cybersource.com”,”billingState”:”NC”,”amount”:”42.7699999999999999433786257441170164384″,”refund”:”N”,”billingCity”:”CONCORD”,”billingLine1″:”Progress Pl”,”billingFirstname”:”test”,”billingLine2″:””,”shopperIP”:”127.0.0.1″,”application”:”OEP2″,”currencyCode”:”USD”,”billingCompany”:”ACN”,”revenueSource”:””,”billingLastname”:”test”,”countryCode”:”US”,”billingAddrNum”:”1000″,”cardType”:”VISA”,”businessPurpose”:”TOOL”,”profileConfig”:”cybersource-MLTEST1″,”language”:”en”,”billingZip”:”28025″,”repOrCustID”:”1233836″,”user”:”DARORATEST”,”paymentMethod”:”CC”,”billingPhone”:””}’

     // Create a JSON object from the JSON String

     var jsonObj = jQuery.parseJSON(jsonString);

//Iterate over Json object and set them as hidden input params to the form
for(obj in jsonObj){
var input = document.createElement(“INPUT”);
input.type = “hidden”;
input.name = obj;
input.value = jsonObj[obj];
form.appendChild(input);
}

//Submit the form
form.submit();

}
</script>

</head>

<body>

     <form>

            <label>Name:</label><Input type=”text”/>

            ……….

            <input type=”button” onclick=”submitAndGoToVendorSite();”/>

    </form>

</body>

That’s It!

~Keep Coding

Tagged , , , , , | Leave a comment

Using multiple profiles in Maven + Eclipse


It’s possible that many of you already knew this but if not then here’ some basic info on Maven profiles. I have been using maven for over 2 and half years now, and have been copy pasting assembly and install files. I never bothered to know how Maven figures out how to read assembly and install file names. For example-

PROBLEM:

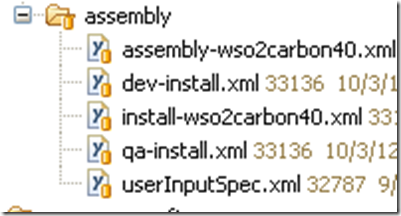
For all my projects I have been using assembly-jboss.xml to put the file/directory information and telling maven about my desired directory structure i.e. Pick files from a/b directory and put it in out directory c/d. The second file install-jboss.xml where I specify my panels, target files etc. It never occurred to me what happens if I change the file names to assembly-zzz.xml and intsall-zzz.xml.

Image 1

Well to cut the story short I checked out a fellow developer code on my machine and the command “mvn clean install” threw build error which said –

[1] [INFO] Searching for file location: C:\Dinesh\workspace\prov-ld-anin-trunk\artifacts\src\assembly\assembly-jboss4.xml

[2] [INFO] File: C:\Dinesh\workspace\prov-ld-anin-trunk\artifacts\src\assembly\assembly-jboss4.xml does not exist.

[3] [INFO] File: C:\Dinesh\workspace\prov-ld-anin-trunk\src\assembly\assembly-jboss4.xml does not exist.


Now I was using IZPack plugin and always thought the assembly and install xmls are part of IZPack configuration, so for half an hour I was searching “IZPack assembly descriptor”. Needless to say I did not get any releveant search result. After scratching my head a little and doing a text search in Eclipse to figure out how am I telling maven to find the specific files (in my case the fellow developer had named them as assembly-wso2carbon40.xml and install-wso2carbon40.xml). No results.

SOLUTION:

In Maven you set up a profile in your .m2/settings.xml. For example my settings.xml looks like this

<settings>
    <profiles>
        <profile>
            <id>jboss4</id>
            <properties>
                <java.home></java.home>
                <compileSource>1.5</compileSource>
                <server>jboss4</server> 
            </properties>
        </profile>
            </profiles>
  </settings>

If you will notice I have specified that <id>jboss4</id> tag has value jboss4. When maven is building your app, it looks for two files assemby-xxx.xml and install-xxx.xml. Here xxxin assembly-xxx.xml is the profile name. So in my case it looks in the settings.xml and sees that profile is jboss, so it uses to find a file assembly-jboss.xml and install-jboss4.xml.

So now the problem was that my developer friend had named the files as assembly-wso2Carbon40.xml and install-wso2Carbon40.xml. The first thing that came to my mind was let’s change the <id>jboss4</id>to <id>wso2</id>, that would resolve my issue. However I had other application where the file was named assembly-jboss.xml and install-jboss4.xml, which meant that my other application will error out on maven clean install and throw error message could not locate assembly file assembly-wso2Carbon40.xml .

Here’s comes the neat part, you can have multiple profiles in your settings file. So I updated my .m2/settings.xml

<settings>
    <profiles>
        <profile>
            <id>jboss</id>
            <properties>
                <svn.username></svn.username>
                <svn.password></svn.password>
                <java.home></java.home>
                <compileSource>1.5</compileSource>
                <server>jboss4</server>
                <server.home>C:\Program Files\jboss-eap-4.3</server.home>
                <server.port>80</server.port>
            </properties>
        </profile>
        <profile>
            <id>wso2</id>
            <properties>
                <compileSource>1.5</compileSource>
                <server>wso2carbon40</server>
            </properties>
        </profile>
    </profiles>
  </settings>

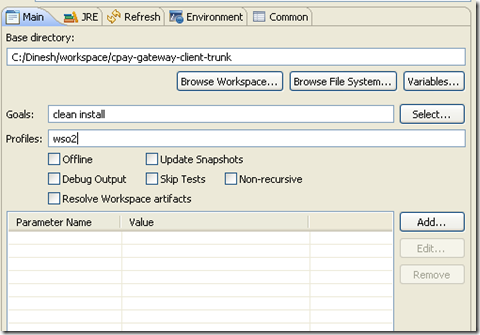
Now when you build the project using Eclipse, just got to Run As ==> Maven Build …  and enter Goals = clean install and Profile = wso2

Image 4


That’s it!


~~Cheers!

Leave a comment

How to send email in PhoneGap (Android) using a gmail account


For the last one month, I have been working on an android app for a grocery store.
I have been using PhoneGap to develop the solution as the client wanted both Android and Iphone version.
I have tried building the app in native Android but going through the hassle of designing css was just too much for me and plus I did not had time to learn Iphone development.

There was a short learning phase for PhoneGap and the results were awesome. However there was one area where I spent hours and ran into several issues. The customer wanted a Feedback section where the user could fill in feedback in a TextArea and hits Submit, which would send an email to customer in the background.

Now PhoneGap has plugin called WebIntent which will open a Email composer where you have to hit Send. This is not what I wanted as customer would have to hit a SUBMIT button, which would open a Email composer window on Phone and then hit Send again. Also this solution also meant user’s email address would be displayed to Grocery store.
I wanted to send the feedback in the background anonymously to Grocery store. I decided to use Java email Api and create a dummy email for grocery store which would be used to send feedback to the Grocery store’s main email address.

I did not find any good tutorial except this one. This is an incomplete tutorial and did not tell you how to create Java classes for Plugin or that you had to make entries in config.xml. So here is the actual tutorial.

Before I begin, let me tell you that I am using latest version of Cordova 2.1.0. This is will not work for Cordova 1.9.0(I will explain the issue below).

Step 1: Add cordova-2.1.0.jar in the project classpath

Step 2: Add cordova-2.1.0.js in the assets/www/js folder.

Step 3: create a new Java class called EmailComoposer.java

package com.dinesh.pb;
import org.apache.cordova.api.Plugin;
import org.apache.cordova.api.PluginResult;
import org.apache.cordova.api.PluginResult.Status;
import org.json.JSONArray;
import org.json.JSONException;
import android.annotation.SuppressLint;
import android.content.Intent;
import android.text.Html;
import com.dinesh.pb.utility.Mail;
 
@SuppressLint("ParserError")
public class EmailComposer extends Plugin {
public final String ACTION_SEND_EMAIL = "sendEmail";

 @Override
 public PluginResult execute(String action, JSONArray arg1, String callbackId) {
 PluginResult result = new PluginResult(Status.INVALID_ACTION);
 if (action.equals(ACTION_SEND_EMAIL)) {
 try {
 String message = arg1.getString(0);
 this.sendEmailViaGmail(message);
 result = new PluginResult(Status.OK);

 }
 catch (JSONException ex) {
 result = new PluginResult(Status.JSON_EXCEPTION, ex.getMessage());
 } catch (Exception e) {
 // TODO Auto-generated catch block
 e.printStackTrace();
 } 
 }
 return result;
 }

 private void sendEmailViaGmail(String body) throws Exception{
 Mail m = new Mail("From_email_address@gmail.com", "your password");
 String[] toArr = {"TO_EMAIL_ADDRESS@gmail.com"};
 m.set_to(toArr);
 m.set_from("FROM_EMAIL_ADDRESS@gmail.com");
 m.set_body(body);
 m.set_subject("TEST SUBJECT");
 boolean sendFlag = m.send();

 }

}

Step 4. copy this Mail.java in package of your choice. My package name is com.dinesh.pb.utility.

package com.dinesh.pb.utility;
import java.util.Date;
import java.util.Properties;
import javax.activation.CommandMap;
import javax.activation.DataHandler;
import javax.activation.DataSource;
import javax.activation.FileDataSource;
import javax.activation.MailcapCommandMap;
import javax.mail.BodyPart;
import javax.mail.Multipart;
import javax.mail.PasswordAuthentication;
import javax.mail.Session;
import javax.mail.Transport;
import javax.mail.internet.InternetAddress;
import javax.mail.internet.MimeBodyPart;
import javax.mail.internet.MimeMessage;
import javax.mail.internet.MimeMultipart;
public class Mail extends javax.mail.Authenticator { 
 private String _user; 
 private String _pass; 

 private String[] _to; 
 private String _from; 

 private String _port; 
 private String _sport; 

 private String _host; 

 private String _subject; 
 private String _body; 

 private boolean _auth; 

 private boolean _debuggable; 

 private Multipart _multipart; 

 public Mail() { 
 _host = "smtp.gmail.com"; // default smtp server 
 _port = "465"; // default smtp port 
 _sport = "465"; // default socketfactory port 

 _user = ""; // username 
 _pass = ""; // password 
 _from = ""; // email sent from 
 _subject = ""; // email subject 
 _body = ""; // email body 

 _debuggable = false; // debug mode on or off - default off 
 _auth = true; // smtp authentication - default on 

 _multipart = new MimeMultipart(); 

 // There is something wrong with MailCap, javamail can not find a handler for the multipart/mixed part, so this bit needs to be added. 
 MailcapCommandMap mc = (MailcapCommandMap) CommandMap.getDefaultCommandMap(); 
 mc.addMailcap("text/html;; x-java-content-handler=com.sun.mail.handlers.text_html"); 
 mc.addMailcap("text/xml;; x-java-content-handler=com.sun.mail.handlers.text_xml"); 
 mc.addMailcap("text/plain;; x-java-content-handler=com.sun.mail.handlers.text_plain"); 
 mc.addMailcap("multipart/*;; x-java-content-handler=com.sun.mail.handlers.multipart_mixed"); 
 mc.addMailcap("message/rfc822;; x-java-content-handler=com.sun.mail.handlers.message_rfc822"); 
 CommandMap.setDefaultCommandMap(mc); 
 } 

 public Mail(String user, String pass) { 
 this(); 

 _user = user; 
 _pass = pass; 
 } 

 public boolean send() throws Exception { 
 Properties props = _setProperties(); 

 if(!_user.equals("") && !_pass.equals("") && _to.length > 0 && !_from.equals("") && !_subject.equals("") && !_body.equals("")) { 
 Session session = Session.getInstance(props, this); 

 MimeMessage msg = new MimeMessage(session); 

 msg.setFrom(new InternetAddress(_from)); 

 InternetAddress[] addressTo = new InternetAddress[_to.length]; 
 for (int i = 0; i < _to.length; i++) { 
 addressTo[i] = new InternetAddress(_to[i]); 
 } 
 msg.setRecipients(MimeMessage.RecipientType.TO, addressTo); 

 msg.setSubject(_subject); 
 msg.setSentDate(new Date()); 

 // setup message body 
 BodyPart messageBodyPart = new MimeBodyPart(); 
 messageBodyPart.setText(_body); 
 _multipart.addBodyPart(messageBodyPart); 

 // Put parts in message 
 msg.setContent(_multipart); 

 // send email 
 Transport.send(msg); 

 return true; 
 } else { 
 return false; 
 } 
 } 

 public void addAttachment(String filename) throws Exception { 
 BodyPart messageBodyPart = new MimeBodyPart(); 
 DataSource source = new FileDataSource(filename); 
 messageBodyPart.setDataHandler(new DataHandler(source)); 
 messageBodyPart.setFileName(filename); 

 _multipart.addBodyPart(messageBodyPart); 
 } 

 public String[] get_to() {
 return _to;
 }
public void set_to(String[] _to) {
 this._to = _to;
 }
public String get_from() {
 return _from;
 }
public void set_from(String _from) {
 this._from = _from;
 }
public String get_body() {
 return _body;
 }
public void set_body(String _body) {
 this._body = _body;
 }
@Override 
 public PasswordAuthentication getPasswordAuthentication() { 
 return new PasswordAuthentication(_user, _pass); 
 } 

 private Properties _setProperties() { 
 Properties props = new Properties(); 

 props.put("mail.smtp.host", _host); 

 if(_debuggable) { 
 props.put("mail.debug", "true"); 
 } 

 if(_auth) { 
 props.put("mail.smtp.auth", "true"); 
 } 

 props.put("mail.smtp.port", _port); 
 props.put("mail.smtp.socketFactory.port", _sport); 
 props.put("mail.smtp.socketFactory.class", "javax.net.ssl.SSLSocketFactory"); 
 props.put("mail.smtp.socketFactory.fallback", "false"); 

 return props; 
 }
public String get_subject() {
 return _subject;
 }
public void set_subject(String _subject) {
 this._subject = _subject;
 }

 // more of the getters and setters ….. 
 }

Step 5: Update the config.xml and add the details about the new plugin class EmailComposer.java.
Mine looks like this – <plugin name=”EmailComposer” value=”com.dinesh.pb.EmailComposer”/>. Please update the package name value=”com.dinesh.pb.EmailComposer” with your package path.

<?xml version="1.0" encoding="utf-8"?> 
<cordova>
    <access origin="http://127.0.0.1*"/> <!-- allow local pages --> 
    <access origin=".*"/> 
    <log level="DEBUG"/>
    <preference name="useBrowserHistory" value="false" />
    <preference name="exit-on-suspend" value="false" />
<plugins>
    <plugin name="App" value="org.apache.cordova.App"/>
    <plugin name="Geolocation" value="org.apache.cordova.GeoBroker"/>
    <plugin name="Device" value="org.apache.cordova.Device"/>
    <plugin name="Accelerometer" value="org.apache.cordova.AccelListener"/>
    <plugin name="Compass" value="org.apache.cordova.CompassListener"/>
    <plugin name="Media" value="org.apache.cordova.AudioHandler"/>
    <plugin name="Camera" value="org.apache.cordova.CameraLauncher"/>
    <plugin name="Contacts" value="org.apache.cordova.ContactManager"/>
    <plugin name="File" value="org.apache.cordova.FileUtils"/>
    <plugin name="NetworkStatus" value="org.apache.cordova.NetworkManager"/>
    <plugin name="Notification" value="org.apache.cordova.Notification"/>
    <plugin name="Storage" value="org.apache.cordova.Storage"/>
    <plugin name="Temperature" value="org.apache.cordova.TempListener"/>
    <plugin name="FileTransfer" value="org.apache.cordova.FileTransfer"/>
    <plugin name="Capture" value="org.apache.cordova.Capture"/>
    <plugin name="Battery" value="org.apache.cordova.BatteryListener"/>
    <plugin name="SplashScreen" value="org.apache.cordova.SplashScreen"/>
    <plugin name="Echo" value="org.apache.cordova.Echo" />
    <plugin name="EmailComposer" value="com.dinesh.pb.EmailComposer"/>
 </plugins>
</cordova>

Step 6: Create a new javascript file called email.js

var EmailComposer = function(){};
/*
cordova.addConstructor(function() {
    cordova.addPlugin("emailcomposer", new EmailComposer());
});
*/
EmailComposer.prototype.send = function (message){
console.log("Calling the send message");
cordova.exec(function(){ alert('feedback sent')}, 
    function(){ alert('feedback was not sent')}, 
    'EmailComposer', 
    'sendEmail', 
    [message]);
}
function sendFeedback(){
    window.EmailComposer.prototype.send("My message body");
}

Now as I mentioned earlier that I am using cordova-2.1.0.js/jar file there are subtle differences between the latest version and older version (cordova-1.9.0).  If you are using older version you will need to uncomment the section cordova.addConstructorabove and instead of calling

window.EmailComposer.prototype.send("My message body");
Use this:

window.plugins.emailComposer.prototype.send(body);

If you do not use it then you may get error which would say that window.plugins is not defined. If you run into such issues use firebug and see what variables are defined under “window” variable.

Notice the method called “feedback()”. I am simply passing the user text as message body by capturing the input from user feedback TextBox. For simplicity I have just pasted a default Email body.

Step 7: Include the js file in your index.html file

// <!–[CDATA[
javascript” src=”js/email.js”>
// ]]>

Step 8: Include cordova js file in index.html

// <!–[CDATA[
javascript” src=”js/cordova-2.1.0.js”>
// ]]>

Step 9: Add three jar files for Java mail api – namely, Activation.jar, Mail.jar and Additional.jar in the libs folder and add it to the classpath. You can these files here.

Cheers!!

UPDATE: A lot of people commented that they could not find mail.jar,additional.jar and actication.jar so I have uploaded them on 4shared.com. You can download them from the link below.

Activation.jar

Additional.jar

Mail.jar

Tagged , , , , , , | 22 Comments

Share any folder on mac via built-in web server


So what’s new here? Well I was playing around with Phonegap to build a small android and ios app. I was able to build a small weather app using Yahoo weather api but then I came across Sencha Touch 2.

I wanted to build the same app in Sencha Touch and compare the two platforms for developing mobile apps and as ap part of its get started tutorial I had to drop the  Sencha Touch in a web server. Now as it always happens with me the most simplest of things don’t work properly for me. I turned on apache server on my mac and added my directory on /etc/apache2/httpd.conf along with and Alias but that did not work out. I constantly ran in forbidden 403 error and tried everything described in various forums but nothing worked and then I came across a post which showed me an alternative way to run a webserver and access my folder without the hassle of apache2 httpd.conf file changes.

It’s really simple, all you need to do is figure out which folder you want to get access to on web server. In my case I wanted to share /Users/dinesharora/Desktop/Mydocument/softwares/sencha-touch-2

so here are the steps:

1. Open the terminal

2. cd /Users/dinesharora/Desktop/Mydocument/softwares/sencha-touch-2

3. type python -m SimpleHTTPServer

4. Hit enter

You will see a message – Serving HTTP on 0.0.0.0 port 8000 …

Now if for some reason you are a stickler and like the old-fashioned 8080 port then just type python -m SimpleHTTPServer 8080.

That’s it. Now access your folder via http://localhost:8000/. If you want to get access to this over another machine then just type http://.local:8080, so for example in my case it would be http://dinesharora.local:8080.

Now you know how to fly a plane, but do you know how to do a safe landing?? Just hit control +c to shut down the server. Dumb!!

Cheers!!


Tagged , , , , , , , , | 1 Comment

Saving files in Amazon S3 using Carrierwave and Fog Gem


Long long time ago in a far far away land….. I am just kidding. So I needed a gem to do file uploads(in my case images but you can upload anything) and I was looking at various options. Paperclip is a popular option but there is a new kid on the block (so i read in various forums)… Carrierwave.

Now I have not used Paperclip but what I read was that Carrierwave is more flexible and powerful than Paperclip so if are interested then keep reading. Now let me tell you that you may need to do some additional settings, I will not get into details because the wiki page of Carrierwave is pretty intensive. The purpose of writing this post is to highlight a couple of issue that I ran into and some settings which were not explained.

Step 1: Install the Carrierwave gem

  gem install carrierwave

Step 2: Update the gem file

gem carrierwave

Step 3: Now you need a uploader. This is the file which has all the settings like which folder the image will be saved, setting the image quality, caching etc. I wanted to call my uploader class as ImageUploader

rails generate uploader ImageUploader

Step 4: Install fog gem

gem install fog

Step 5: Update gem file

gem ‘fog’, ‘~> 1.3.1’

bundle install

Step 6: Choose the storage type

class ImageUploader < CarrierWave::Uploader::Base

     storage :fog

end

Step 7: Create model. Mine was called Photo so I create photo.rb. Notice the line number 10.

class Photo < ActiveRecord::Base

#Attributes or fileds
attr_accessible :image,:pic_name,:description,:albums_id

#associations
belongs_to :albums

#carrier wave
mount_uploader :image,ImageUploader

#Validations
validates :description,:pic_name,:albums_id, :presence=>true
validates_uniqueness_of :pic_name
end

Step 7: How to upload file and show uploaded file in the html page

Upload page:

<%= form_for @user, :html => {:multipart => true} do |f| %>
  <p>
    <label>My Avatar</label>
    <%= f.file_field :avatar %>
    <%= f.hidden_field :avatar_cache %>
  </p>
<% end %>

View uploaded image

<%= form_for @user, :html => {:multipart => true} do |f| %>
  <p>
    <label>My Avatar</label>
    <%= image_tag(@user.avatar_url) if @user.avatar? %>
    <%= f.file_field :avatar %>
    <%= f.hidden_field :avatar_cache %>
  </p>
<% end %>

Step 8: Now comes the most important part. Setting up fog. Now if you follow the documentation on  Carrierwave then you will run into issue(I will explain the issue and fix below). The wiki page said create a file fog.rb in the lib/carrierwave/storage/fog.rb and that’s what I did. I created the file with the contents below.

CarrierWave.configure do |config|
  config.fog_credentials = {
    :provider               => 'AWS',       # required
    :aws_access_key_id      => 'xxx',       # required
    :aws_secret_access_key  => 'yyy',       # required
    :region                 => 'eu-west-1'  # optional, defaults to 'us-east-1'
  }
  config.fog_directory  = 'name_of_directory'                     # required
  config.fog_host       = 'https://assets.example.com'            # optional, defaults to nil
  config.fog_public     = false                                   # optional, defaults to true
  config.fog_attributes = {'Cache-Control'=>'max-age=315576000'}  # optional, defaults to {}
end

Now before you start you need to have a S3 account on Amazon S3. So get your Amazon access key and secret access key. For example mine was …. hehehe no I am not going to share my access keys with you :-). Anyway if you forgot to note down your access key and incase you are wondering where I can find that and are guessing that it will be on S3 Dashboard then you are mistaken just like me. You can find that on your account settings –> Security credentials.

So after you have noted down your key and access key. Go ahead create a bucket on S3. A bucket is nothing but a directory. It’s just a fancy shimancy name for directory that Amazon came up with. You can further create sub directories.

Now coming back to the meaty part and fog.rb file. I updated the below fields in the fog.rb

:aws_access_key_id      => 'xxx',       # required
    :aws_secret_access_key  => 'yyy',       # required

I commented out the below lines as they are optional

#:region                 => ‘eu-west-1’  # optional, defaults to ‘us-east-1’

I was not sure what was my region so if you are not sure as well then go ahead and comment it.

#config.fog_host = ‘https://s3.amazonaws.com&#8217; # optional, defaults to nil
#config.fog_public = true # optional, defaults to true

If you leave config.fog_host to https://s3.amazonaws.com then I ran into issues which said –

“LoadError (Expected /Users/dinesharora/Desktop/Mydocument/ruby-proj/album/app/uploaders/image_uploader.rb to define ImageUploader):”

So I commented that field. 

The next part that I was not sure about was how to tell fog which folder or directory I want to upload my files. I had created a bucket(directory) called myalbums and had created a sub folder called devlopment.

So I updated

config.fog_directory  = ‘myalbums/development‘, which did not work. The right way to do is

config.fog_directory  = ‘myalbums’ and also in ImageUploader  update the line

def store_dir
“development/uploads/#{model.class.to_s.underscore}/#{mounted_as}/#{model.id}”
end

That’s it. Now just start the server and start uploading, that’s what the forums said but as it always happens with me(nothing works for me the first time) I ran into error(as I mentioned earlier that you will if you create the fog.rb in lib/carrierwave/storage/ folder) which said –

ActionController::RoutingError (uninitialized constant CarrierWave::Storage::Fog):
app/uploaders/image_uploader.rb:11:in `<class:ImageUploader>’
app/uploaders/image_uploader.rb:3:in `<top (required)>’
app/models/photo.rb:10:in `<class:Photo>’
app/models/photo.rb:1:in `<top (required)>’
app/controllers/photo_controller.rb:1:in `<top (required)>’

To get rid of this error, just copy the file in config/initializers and now I could finally say – That’s it!!!! 🙂

~~~ Cheers!

Tagged , , , , , , , , | 5 Comments